# face-api.js
 (opens new window)
 ![]() (opens new window)
(opens new window)
在tensorflow.js核心之上实现的针对浏览器和Node.js的JavaScript人脸识别API (tensorflow/tfjs-core (opens new window))
# 单击演示! (opens new window)
# 讲解
- face-api.js — 使用tensorflow.js在浏览器中实现人脸识别的JavaScript API (opens new window)
- 使用face-api.js的MTCNN人脸检测器进行实时JavaScript人脸跟踪和人脸识别 (opens new window)
- 实时网络摄像头面部检测和情感识别 - 视频 (opens new window)
- JavaScript轻松面部识别教程 - 视频 (opens new window)
- 将face-api.js与Vue.js和Electron结合使用 (opens new window)
- 为人添加面具-Gant Laborde与Jason一起学习 (opens new window)
# 示例
# 人脸识别
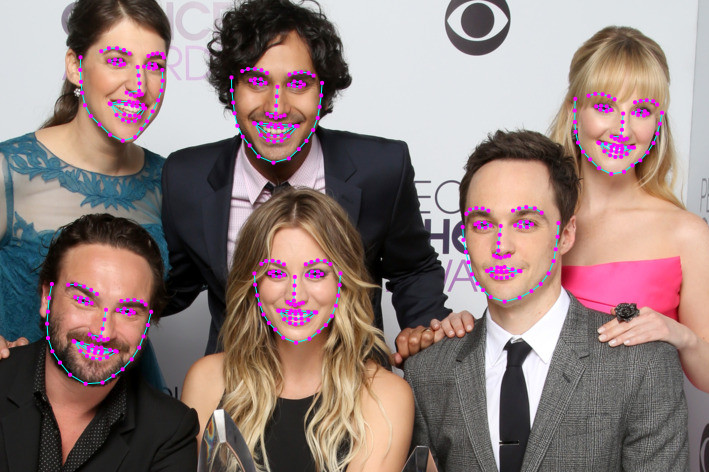
# 人脸坐标检测
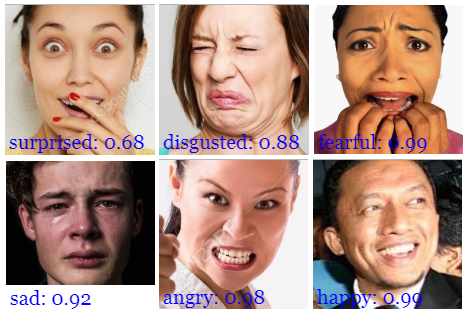
# 人脸表情识别
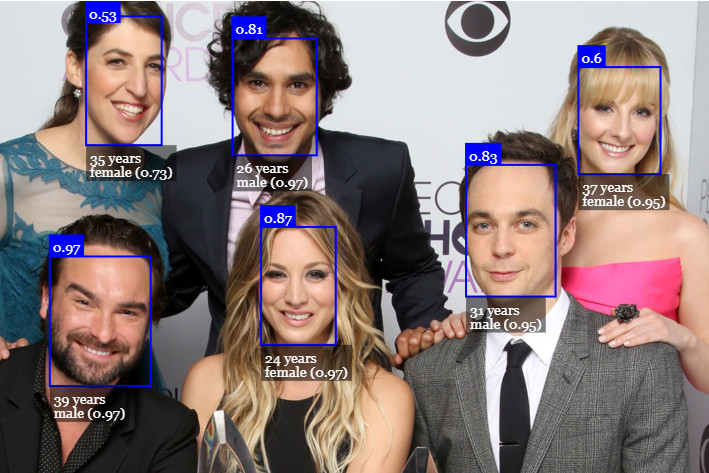
# 年龄估计和性别识别
# 运行示例
克隆这个仓库:
git clone https://github.com/justadudewhohacks/face-api.js.git
# 运行浏览器示例
cd face-api.js/examples/examples-browser
npm i
npm start
Browse to http://localhost:3000/.
# 运行Node.js示例
cd face-api.js/examples/examples-nodejs
npm i
Now run one of the examples using ts-node:
ts-node faceDetection.ts
Or simply compile and run them with node:
tsc faceDetection.ts
node faceDetection.js
# 用于浏览器的face-api.js
Simply include the latest script from dist/face-api.js (opens new window).
或通过npm安装:
npm i face-api.js
# 用于 Node.js 的 face-api.js
我们可以通过填充一些浏览器细节(例如HTMLImageElement,HTMLCanvasElement和ImageData),在nodejs环境中使用等效的API。最简单的方法是安装node-canvas软件包。
另外,您可以简单地从图像数据构造自己的张量,然后将张量作为输入传递到API。
此外,您还想安装@ tensorflow / tfjs-node(不是必需的,但强烈建议使用),它可以通过编译并绑定到本机Tensorflow C ++库来大大加快运行速度:
npm i face-api.js canvas @tensorflow/tfjs-node
现在,我们简单地猴子修补环境以使用polyfills:
// import nodejs bindings to native tensorflow,
// not required, but will speed up things drastically (python required)
import '@tensorflow/tfjs-node';

// implements nodejs wrappers for HTMLCanvasElement, HTMLImageElement, ImageData
import * as canvas from 'canvas';

import * as faceapi from 'face-api.js';

// patch nodejs environment, we need to provide an implementation of
// HTMLCanvasElement and HTMLImageElement
const { Canvas, Image, ImageData } = canvas
faceapi.env.monkeyPatch({ Canvas, Image, ImageData })
# Getting Started
# 加载模型
所有全局神经网络实例都通过faceapi.nets导出:
console.log(faceapi.nets)
// ageGenderNet
// faceExpressionNet
// faceLandmark68Net
// faceLandmark68TinyNet
// faceRecognitionNet
// ssdMobilenetv1
// tinyFaceDetector
// tinyYolov2
要加载模型,您必须提供相应的manifest.json文件以及模型权重文件(碎片)作为资产。 只需将它们复制到您的公共或资产文件夹中即可。 模型的manifest.json和分片文件必须位于同一目录中,并且可以在同一路径下访问。
假设模型位于 public/models:
await faceapi.nets.ssdMobilenetv1.loadFromUri('/models')
// accordingly for the other models:
// await faceapi.nets.faceLandmark68Net.loadFromUri('/models')
// await faceapi.nets.faceRecognitionNet.loadFromUri('/models')
// ...
在nodejs环境中,您还可以直接从磁盘加载模型:
await faceapi.nets.ssdMobilenetv1.loadFromDisk('./models')
您也可以从tf.NamedTensorMap加载模型:
await faceapi.nets.ssdMobilenetv1.loadFromWeightMap(weightMap)
或者,您也可以创建自己的神经网络实例:
const net = new faceapi.SsdMobilenetv1()
await net.loadFromUri('/models')
您还可以将权重作为Float32Array加载(如果要使用未压缩的模型):
// using fetch
net.load(await faceapi.fetchNetWeights('/models/face_detection_model.weights'))

// using axios
const res = await axios.get('/models/face_detection_model.weights', { responseType: 'arraybuffer' })
const weights = new Float32Array(res.data)
net.load(weights)
# 高级API
在下面的输入中,input 可以是HTML<img>,视频或画布元素,也可以是该元素的ID.
<img id="myImg" src="images/example.png" />
<video id="myVideo" src="media/example.mp4" />
<canvas id="myCanvas" />
const input = document.getElementById('myImg')
// const input = document.getElementById('myVideo')
// const input = document.getElementById('myCanvas')
// or simply:
// const input = 'myImg'
# 侦测人脸
Detect all faces in an image. Returns Array<FaceDetection>:
const detections = await faceapi.detectAllFaces(input)
检测图像中具有最高置信度得分的脸部。 返回 FaceDetection | undefined:
const detection = await faceapi.detectSingleFace(input)
默认情况下,detectAllFaces 和 detectSingleFace 使用SSD Mobilenet V1人脸检测器。 您可以通过传递相应的选项对象来指定面部检测器:
const detections1 = await faceapi.detectAllFaces(input, new faceapi.SsdMobilenetv1Options())
const detections2 = await faceapi.detectAllFaces(input, new faceapi.TinyFaceDetectorOptions())
您可以调整每个面部检测器的选项,如图所示 here.
# 检测68个人脸地标点
在面部检测之后,我们可以进一步预测每个检测到的面部的面部标志,如下所示:
检测图像中的所有面部+为每个检测到的面部计算68点面部地标. 返回 Array<WithFaceLandmarks<WithFaceDetection<{}>>>:
const detectionsWithLandmarks = await faceapi.detectAllFaces(input).withFaceLandmarks()
检测图像中具有最高置信度得分的人脸,并为该人脸计算68个点人脸地标. 返回 WithFaceLandmarks<WithFaceDetection<{}>> | undefined:
const detectionWithLandmarks = await faceapi.detectSingleFace(input).withFaceLandmarks()
您还可以指定使用微小模型而不是默认模型:
const useTinyModel = true
const detectionsWithLandmarks = await faceapi.detectAllFaces(input).withFaceLandmarks(useTinyModel)
# 计算人脸描述符
在人脸检测和人脸界标预测之后,可以如下计算每个人脸的人脸描述符:
检测图像中的所有面部,并为每个检测到的面部计算68点面部地标。返回 Array<WithFaceDescriptor<WithFaceLandmarks<WithFaceDetection<{}>>>>:
const results = await faceapi.detectAllFaces(input).withFaceLandmarks().withFaceDescriptors()
Detect the face with the highest confidence score in an image + compute 68 Point Face Landmarks and face descriptor for that face. Returns WithFaceDescriptor<WithFaceLandmarks<WithFaceDetection<{}>>> | undefined:
const result = await faceapi.detectSingleFace(input).withFaceLandmarks().withFaceDescriptor()
# 识别面部表情
可以对检测到的脸部进行脸部表情识别,如下所示:
检测图像中的所有面部+识别每个面部的面部表情。 返回 Array<WithFaceExpressions<WithFaceLandmarks<WithFaceDetection<{}>>>>:
const detectionsWithExpressions = await faceapi.detectAllFaces(input).withFaceLandmarks().withFaceExpressions()
检测图像中具有最高置信度得分的面部,并识别该面部的面部表情。 返回 WithFaceExpressions<WithFaceLandmarks<WithFaceDetection<{}>>> | undefined:
const detectionWithExpressions = await faceapi.detectSingleFace(input).withFaceLandmarks().withFaceExpressions()
您也可以跳过.withFaceLandmarks(),这将跳过人脸对齐步骤(稳定性较差):
检测所有没有面部对齐的面部+识别每个面部的面部表情. 返回 Array<WithFaceExpressions<WithFaceDetection<{}>>>:
const detectionsWithExpressions = await faceapi.detectAllFaces(input).withFaceExpressions()
在没有面部对齐的情况下检测具有最高置信度得分的面部+识别该面部的面部表情。 返回 WithFaceExpressions<WithFaceDetection<{}>> | undefined:
const detectionWithExpressions = await faceapi.detectSingleFace(input).withFaceExpressions()
# 年龄估计和性别识别
从检测到的脸部进行年龄估计和性别识别的方法如下:
检测图像中的所有面孔+估计年龄并识别每张面孔的性别。 返回 Array<WithAge<WithGender<WithFaceLandmarks<WithFaceDetection<{}>>>>>:
const detectionsWithAgeAndGender = await faceapi.detectAllFaces(input).withFaceLandmarks().withAgeAndGender()
检测图像中具有最高置信度得分的面部+估计年龄,并识别该面部的性别。 返回 WithAge<WithGender<WithFaceLandmarks<WithFaceDetection<{}>>>> | undefined:
const detectionWithAgeAndGender = await faceapi.detectSingleFace(input).withFaceLandmarks().withAgeAndGender()
您也可以跳过.withFaceLandmarks(),这将跳过人脸对齐步骤(稳定性较差):
检测所有没有面部对齐的面孔+估计年龄并识别每张面孔的性别。 返回 Array<WithAge<WithGender<WithFaceDetection<{}>>>>:
const detectionsWithAgeAndGender = await faceapi.detectAllFaces(input).withAgeAndGender()
在没有面部对齐的情况下检测具有最高置信度得分的面部,并估计年龄并识别该面部的性别。返回 WithAge<WithGender<WithFaceDetection<{}>>> | undefined:
const detectionWithAgeAndGender = await faceapi.detectSingleFace(input).withAgeAndGender()
# 任务组成
任务可以组成如下:
// all faces
await faceapi.detectAllFaces(input)
await faceapi.detectAllFaces(input).withFaceExpressions()
await faceapi.detectAllFaces(input).withFaceLandmarks()
await faceapi.detectAllFaces(input).withFaceLandmarks().withFaceExpressions()
await faceapi.detectAllFaces(input).withFaceLandmarks().withFaceExpressions().withFaceDescriptors()
await faceapi.detectAllFaces(input).withFaceLandmarks().withAgeAndGender().withFaceDescriptors()
await faceapi.detectAllFaces(input).withFaceLandmarks().withFaceExpressions().withAgeAndGender().withFaceDescriptors()

// single face
await faceapi.detectSingleFace(input)
await faceapi.detectSingleFace(input).withFaceExpressions()
await faceapi.detectSingleFace(input).withFaceLandmarks()
await faceapi.detectSingleFace(input).withFaceLandmarks().withFaceExpressions()
await faceapi.detectSingleFace(input).withFaceLandmarks().withFaceExpressions().withFaceDescriptor()
await faceapi.detectSingleFace(input).withFaceLandmarks().withAgeAndGender().withFaceDescriptor()
await faceapi.detectSingleFace(input).withFaceLandmarks().withFaceExpressions().withAgeAndGender().withFaceDescriptor()
# 匹配描述符的人脸识别
为了执行面部识别,可以使用faceapi.FaceMatcher比较参考面部描述符和查询面部描述符。
首先,我们使用参考数据初始化FaceMatcher,例如,我们可以简单地在referenceImage中检测面部并将匹配的面部描述符与后续图像的面部进行匹配
const results = await faceapi
  .detectAllFaces(referenceImage)
  .withFaceLandmarks()
  .withFaceDescriptors()

if (!results.length) {
  return
}

// create FaceMatcher with automatically assigned labels
// from the detection results for the reference image
const faceMatcher = new faceapi.FaceMatcher(results)
现在我们可以识别出如图所示的人脸 queryImage1:
const singleResult = await faceapi
  .detectSingleFace(queryImage1)
  .withFaceLandmarks()
  .withFaceDescriptor()

if (singleResult) {
  const bestMatch = faceMatcher.findBestMatch(singleResult.descriptor)
  console.log(bestMatch.toString())
}
或者我们可以识别出所有显示在 queryImage2:
const results = await faceapi
  .detectAllFaces(queryImage2)
  .withFaceLandmarks()
  .withFaceDescriptors()

results.forEach(fd => {
  const bestMatch = faceMatcher.findBestMatch(fd.descriptor)
  console.log(bestMatch.toString())
})
您还可以如下创建带标签的引用描述符:
const labeledDescriptors = [
  new faceapi.LabeledFaceDescriptors(
    'obama',
    [descriptorObama1, descriptorObama2]
  ),
  new faceapi.LabeledFaceDescriptors(
    'trump',
    [descriptorTrump]
  )
]

const faceMatcher = new faceapi.FaceMatcher(labeledDescriptors)
# 显示检测结果
准备覆盖画布:
const displaySize = { width: input.width, height: input.height }
// resize the overlay canvas to the input dimensions
const canvas = document.getElementById('overlay')
faceapi.matchDimensions(canvas, displaySize)
face-api.js预定义了一些高级绘图功能,您可以利用它们:
/* Display detected face bounding boxes */
const detections = await faceapi.detectAllFaces(input)
// resize the detected boxes in case your displayed image has a different size than the original
const resizedDetections = faceapi.resizeResults(detections, displaySize)
// draw detections into the canvas
faceapi.draw.drawDetections(canvas, resizedDetections)

/* Display face landmarks */
const detectionsWithLandmarks = await faceapi
  .detectAllFaces(input)
  .withFaceLandmarks()
// resize the detected boxes and landmarks in case your displayed image has a different size than the original
const resizedResults = faceapi.resizeResults(detectionsWithLandmarks, displaySize)
// draw detections into the canvas
faceapi.draw.drawDetections(canvas, resizedResults)
// draw the landmarks into the canvas
faceapi.draw.drawFaceLandmarks(canvas, resizedResults)


/* Display face expression results */
const detectionsWithExpressions = await faceapi
  .detectAllFaces(input)
  .withFaceLandmarks()
  .withFaceExpressions()
// resize the detected boxes and landmarks in case your displayed image has a different size than the original
const resizedResults = faceapi.resizeResults(detectionsWithExpressions, displaySize)
// draw detections into the canvas
faceapi.draw.drawDetections(canvas, resizedResults)
// draw a textbox displaying the face expressions with minimum probability into the canvas
const minProbability = 0.05
faceapi.draw.drawFaceExpressions(canvas, resizedResults, minProbability)
您还可以绘制带有自定义文本的框 (DrawBox (opens new window)):
const box = { x: 50, y: 50, width: 100, height: 100 }
// see DrawBoxOptions below
const drawOptions = {
  label: 'Hello I am a box!',
  lineWidth: 2
}
const drawBox = new faceapi.draw.DrawBox(box, drawOptions)
drawBox.draw(document.getElementById('myCanvas'))
DrawBox绘图选项:
export interface IDrawBoxOptions {
  boxColor?: string
  lineWidth?: number
  drawLabelOptions?: IDrawTextFieldOptions
  label?: string
}
最后,您可以绘制自定义文本字段 (DrawTextField (opens new window)):
const text = [
  'This is a textline!',
  'This is another textline!'
]
const anchor = { x: 200, y: 200 }
// see DrawTextField below
const drawOptions = {
  anchorPosition: 'TOP_LEFT',
  backgroundColor: 'rgba(0, 0, 0, 0.5)'
}
const drawBox = new faceapi.draw.DrawTextField(text, anchor, drawOptions)
drawBox.draw(document.getElementById('myCanvas'))
绘制文本字段的绘制选项:
export interface IDrawTextFieldOptions {
  anchorPosition?: AnchorPosition
  backgroundColor?: string
  fontColor?: string
  fontSize?: number
  fontStyle?: string
  padding?: number
}

export enum AnchorPosition {
  TOP_LEFT = 'TOP_LEFT',
  TOP_RIGHT = 'TOP_RIGHT',
  BOTTOM_LEFT = 'BOTTOM_LEFT',
  BOTTOM_RIGHT = 'BOTTOM_RIGHT'
}
# 人脸检测选项
# SsdMobilenetv1Options
export interface ISsdMobilenetv1Options {
  // minimum confidence threshold
  // default: 0.5
  minConfidence?: number

  // maximum number of faces to return
  // default: 100
  maxResults?: number
}

// example
const options = new faceapi.SsdMobilenetv1Options({ minConfidence: 0.8 })
# 微小的面部检测器选项接口
export interface ITinyFaceDetectorOptions {
  // size at which image is processed, the smaller the faster,
  // but less precise in detecting smaller faces, must be divisible
  // by 32, common sizes are 128, 160, 224, 320, 416, 512, 608,
  // for face tracking via webcam I would recommend using smaller sizes,
  // e.g. 128, 160, for detecting smaller faces use larger sizes, e.g. 512, 608
  // default: 416
  inputSize?: number

  // minimum confidence threshold
  // default: 0.5
  scoreThreshold?: number
}

// example
const options = new faceapi.TinyFaceDetectorOptions({ inputSize: 320 })
# 实用程序类
# Box接口
export interface IBox {
  x: number
  y: number
  width: number
  height: number
}
# 人脸检测接口
export interface IFaceDetection {
  score: number
  box: Box
}
# 面部坐标接口
export interface IFaceLandmarks {
  positions: Point[]
  shift: Point
}
# 带人脸检测
export type WithFaceDetection<TSource> = TSource & {
  detection: FaceDetection
}
# 带脸部地标
export type WithFaceLandmarks<TSource> = TSource & {
  unshiftedLandmarks: FaceLandmarks
  landmarks: FaceLandmarks
  alignedRect: FaceDetection
}
# 带面部描述符
export type WithFaceDescriptor<TSource> = TSource & {
  descriptor: Float32Array
}
# 带有面部表情
export type WithFaceExpressions<TSource> = TSource & {
  expressions: FaceExpressions
}
# 带有年龄
export type WithAge<TSource> = TSource & {
  age: number
}
# 带有性别
export type WithGender<TSource> = TSource & {
  gender: Gender
  genderProbability: number
}

export enum Gender {
  FEMALE = 'female',
  MALE = 'male'
}
# 其他有用的工具
# 使用底层API
您可以直接使用每个神经网络的转发方法,而不必使用高级API:
const detections1 = await faceapi.ssdMobilenetv1(input, options)
const detections2 = await faceapi.tinyFaceDetector(input, options)
const landmarks1 = await faceapi.detectFaceLandmarks(faceImage)
const landmarks2 = await faceapi.detectFaceLandmarksTiny(faceImage)
const descriptor = await faceapi.computeFaceDescriptor(alignedFaceImage)
# 提取图像区域的画布
const regionsToExtract = [
  new faceapi.Rect(0, 0, 100, 100)
]
// actually extractFaces is meant to extract face regions from bounding boxes
// but you can also use it to extract any other region
const canvases = await faceapi.extractFaces(input, regionsToExtract)
# 欧式距离
// ment to be used for computing the euclidean distance between two face descriptors
const dist = faceapi.euclideanDistance([0, 0], [0, 10])
console.log(dist) // 10
# 检索人脸坐标点和轮廓
const landmarkPositions = landmarks.positions

// or get the positions of individual contours,
// only available for 68 point face ladnamrks (FaceLandmarks68)
const jawOutline = landmarks.getJawOutline()
const nose = landmarks.getNose()
const mouth = landmarks.getMouth()
const leftEye = landmarks.getLeftEye()
const rightEye = landmarks.getRightEye()
const leftEyeBbrow = landmarks.getLeftEyeBrow()
const rightEyeBrow = landmarks.getRightEyeBrow()
# 从URL获取和显示图像
<img id="myImg" src="">
const image = await faceapi.fetchImage('/images/example.png')

console.log(image instanceof HTMLImageElement) // true

// displaying the fetched image content
const myImg = document.getElementById('myImg')
myImg.src = image.src
# 请求JSON数据
const json = await faceapi.fetchJson('/files/example.json')
# 创建一个图像选择器
<img id="myImg" src="">
<input id="myFileUpload" type="file" onchange="uploadImage()" accept=".jpg, .jpeg, .png">
async function uploadImage() {
  const imgFile = document.getElementById('myFileUpload').files[0]
  // create an HTMLImageElement from a Blob
  const img = await faceapi.bufferToImage(imgFile)
  document.getElementById('myImg').src = img.src
}
# 从图像或视频元素创建画布元素
<img id="myImg" src="images/example.png" />
<video id="myVideo" src="media/example.mp4" />
const canvas1 = faceapi.createCanvasFromMedia(document.getElementById('myImg'))
const canvas2 = faceapi.createCanvasFromMedia(document.getElementById('myVideo'))
# 可用型号
# 人脸检测模型
# SSD Mobilenet V1
对于人脸检测,该项目实现了基于MobileNetV1的SSD(单发多盒检测器)。 神经网络将计算图像中每个面部的位置,并将返回边界框以及每个面部的概率。 该面部检测器旨在在检测面部边界框方面获得高精度,而不是低的推理时间。 量化模型的大小约为5.4 MB (ssd_mobilenetv1_model).
人脸检测模型已经通过以下进行训练 WIDERFACE dataset (opens new window) , 权重由 yeephycho (opens new window) 在 this (opens new window) 仓库.
# 微小的面部检测器
Tiny Face Detector是一种高性能的实时面部检测器,与SSD Mobilenet V1面部检测器相比,它更快,更小且资源消耗更少,因此,它在检测小面部方面的性能稍差。 该模型具有极佳的移动性和Web友好性,因此它应该是您在移动设备和资源受限的客户端上的GO-TO人脸检测器。 量化模型的大小仅为190 KB(tiny_face_detector_model)。
面部检测器已在约14K图像的自定义数据集上训练,该数据集带有边框。 此外,该模型已经过训练,可以预测完全覆盖面部特征点的边界框,因此与SSD Mobilenet V1相比,与随后的面部界标检测结合使用时,通常产生更好的结果。
该模型基本上是Tiny Yolo V2的甚至更细小的版本,用深度可分离的卷积代替了Yolo的常规卷积。 Yolo是完全卷积的,因此可以轻松地适应不同的输入图像大小,以牺牲性能(推理时间)的准确性。
# 68 点脸地标检测模型
该软件包实现了非常轻巧,快速但准确的68点面部界标检测器。 默认模型的大小仅为350kb(face_landmark_68_model),微型模型的大小仅为80kb(face_landmark_68_tiny_model)。 两种模型都采用了深度可分离卷积以及密集连接的块的思想。 该模型已在约有35,000张面部图像的数据集上进行了训练,这些数据用68个面部界标点标记。
# 人脸识别模型
对于人脸识别,实施类似于ResNet-34的体系结构以从任何给定的人脸图像计算人脸描述符(具有128个值的特征向量),该描述符用于描述人脸的特征。 该模型“不限于”用于训练的脸部集合,这意味着您可以将其用于任何人(例如您自己)的脸部识别。 您可以通过比较两个任意脸部的脸部描述符来确定它们的相似性,例如,通过计算欧几里德距离或使用您选择的任何其他分类器。
神经网络等效于 face-recognition.js (opens new window) 中使用的 FaceRecognizerNet 和 dlib (opens new window) 人脸识别示例。 权重已经通过 davisking (opens new window) 进行了训练,该模型在LFW(野外标签脸)基准进行人脸识别时达到了99.38%的预测准确性。
量化模型的大小约为6.2 MB (face_recognition_model).
# 人脸表情识别模型
面部表情识别模型轻巧,快速,并提供合理的准确性。 该模型的大小约为310kb,采用深度可分离卷积和密集连接的块。 已经对来自公开可用数据集的各种图像以及从网络上抓取的图像进行了培训。 请注意,戴眼镜可能会降低预测结果的准确性。
# 年龄和性别识别模型
年龄和性别识别模型是一个多任务网络,它使用特征提取层,年龄回归层和性别分类器。 该模型的大小约为420kb,特征提取器采用了与Xception比较细微但非常相似的体系结构。
此模型已在以下数据库中经过训练和测试,每个数据库分别进行80/20的训练/测试划分:UTK,FGNET,Chalearn,Wiki,IMDB *,CACD *,MegaAge,MegaAge-Asian。 *表示这些数据库已通过算法清理,因为初始数据库非常嘈杂。
# 总测试结果
总MAE(平均年龄误差): 4.54
总性别准确度: 95%
# 每个数据库的测试结果
“-”表示没有可用于这些数据库的性别标签。
| Database | UTK | FGNET | Chalearn | Wiki | IMDB* | CACD* | MegaAge | MegaAge-Asian |
|---|---|---|---|---|---|---|---|---|
| MAE | 5.25 | 4.23 | 6.24 | 6.54 | 3.63 | 3.20 | 6.23 | 4.21 |
| Gender Accuracy | 0.93 | - | 0.94 | 0.95 | - | 0.97 | - | - |
# 不同年龄组的测试结果
| Age Range | 0 - 3 | 4 - 8 | 9 - 18 | 19 - 28 | 29 - 40 | 41 - 60 | 60 - 80 | 80+ |
|---|---|---|---|---|---|---|---|---|
| MAE | 1.52 | 3.06 | 4.82 | 4.99 | 5.43 | 4.94 | 6.17 | 9.91 |
| Gender Accuracy | 0.69 | 0.80 | 0.88 | 0.96 | 0.97 | 0.97 | 0.96 | 0.9 |
机器学习 →